Orchid Care Simplified: Keep Your Blooms Flourishing
Posted on 04/09/2025
Orchid Care Simplified: Keep Your Blooms Flourishing
If you've ever been captivated by the elegant beauty of orchids, you're not alone. Many plant enthusiasts are drawn to these enchanting flowers, hoping to nurture them at home. But orchid care is often misunderstood, leading to drooping leaves and lifeless blooms. The good news? Keeping your orchids thriving doesn't need to be complicated. This comprehensive guide will help you master the basics and advanced tips, ensuring your orchids stay vibrant and bloom
for years to come.
Understanding Orchids: A Brief Introduction
Orchids belong to the Orchidaceae family, one of the largest flowering plant families in the world. Their diverse forms, stunning blooms, and fascinating growth habits have made them popular ornamental houseplants. With over 25,000 species and 100,000 hybrids, orchids come in an astonishing variety of colors, shapes, and sizes.
Common Types of Orchids for Home Gardeners
- Phalaenopsis (Moth Orchid): Easy to care for, long-blooming, available in many colors.
- Cattleya: Known for their gorgeous, fragrant flowers, often called the "Queen of Orchids".
- Dendrobium: Tall canes with blooms in an array of shapes and hues.
- Oncidium (Dancing Lady Orchid): Showy, branched sprays of flowers.
- Paphiopedilum (Lady Slipper Orchid): Unique pouch-shaped blooms, tolerant of lower light.
While each type of orchid has unique needs, the core principles of orchid maintenance apply to most varieties. Learning these will simplify your plant care routine and enhance your orchids' health.

Essential Orchid Care: Light, Water, and Humidity
Light, water, and humidity form the foundation of healthy orchid habits. Over or underdoing any of these can interrupt the orchid's natural growth cycle.
Providing the Right Amount of Light
- Bright, indirect light: Most orchids prefer filtered sunlight. A spot near an east or west-facing window is ideal. Avoid harsh midday sun, which may scorch leaves.
- Leaf color as a guide: Healthy orchid leaves should be a bright, light green. Dark green means too little light, while yellowish leaves suggest too much.
- Tip: If natural light is limited, use a grow light specifically designed for orchids.
Mastering Watering Techniques
- Less is more: Overwatering is the number one killer of orchids. Typically, water once a week in winter and every 4-5 days in summer. Always check that the potting mix is almost dry before the next watering.
- Water thoroughly: Let water run through the pot to soak roots, then ensure excellent drainage so roots don't sit in water.
- Avoid tap water: Where possible, use rainwater or filtered water to prevent mineral build-up.
Maintaining Proper Humidity
- Target range: Orchids thrive in 40-60% humidity. In drier homes, set the pot on a tray of pebbles and water or use a small humidifier.
- Good air movement: Prevent stagnant air, which can encourage fungal disease. Gently circulate air with a fan if needed.
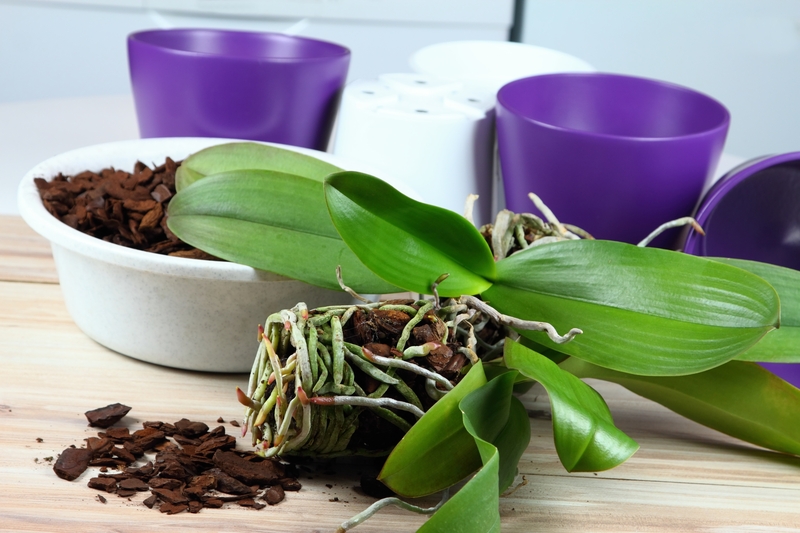
Potting and Repotting Orchids
Proper potting techniques are vital to orchid plant care. Orchids do not thrive in regular soil. Instead, these epiphytes grow best in special mixes that mimic their natural habitat: the bark of trees or rocky surfaces.
Choosing the Right Orchid Potting Medium
- Pine bark: The most widely used, ensuring good aeration.
- Sphagnum moss: Retains moisture, ideal for young or moisture-loving orchids.
- Coconut husk chips: Holds water longer than bark, still provides airy roots.
- Perlite or charcoal: Improves drainage and avoids compacting.
*Never use garden soil, which suffocates orchid roots and causes rot.*
How and When to Repot Your Orchid
- Frequency: Repot every 1-2 years or when the potting mix breaks down.
- Best time: After bloom ends or when new growth appears.
- Signs you need to repot: Roots crawling out of the pot, water runs straight through, or the mix appears soggy and old.
Repotting Steps:
- Remove orchid from its pot and shake off old medium.
- Trim any dead or rotten roots.
- Place the orchid in a clean pot just big enough for its root ball.
- Add fresh potting mix, gently filling in around the roots while leaving room for air.
- Water lightly and keep in indirect light for a week to reduce repotting stress.
Fertilizing for Healthy Orchids
Orchids are light feeders, but they still need a balanced diet. The right orchid fertilizer provides essential nutrients to encourage stunning, long-lasting blooms.
Choosing and Using Orchid Fertilizer
- Use a balanced formula: Look for 20-20-20 or similar, with equal parts nitrogen, phosphorus, and potassium. Some growers prefer formulas labeled specifically for orchids.
- Frequency: During active growth (spring/summer), feed every other week. In winter, reduce to once a month or as growth slows.
- Weakly, weekly: Apply fertilizer at half the recommended strength to avoid root burn.
Supporting Orchid Blooming and Re-Blooming
Vivid blooms are the main reason people fall for orchids. But, getting an orchid to re-bloom can be a mystery. Here are proven secrets to regular, spectacular flowering:
Key Factors for Flowering Success
- Daylength: Many orchids need 12-14 hours of light daily during bloom season. Supplement with grow lights if needed.
- Temperature drops: Mimic nature with a 10?F (5?C) drop at night for 2-4 weeks to kickstart flower production, especially for Phalaenopsis.
- Rest periods: Some orchids (like Dendrobiums) require a dry rest period to encourage blooms after growth.
After-Bloom Care
- Remove spent spikes: For Phalaenopsis, cut the flower spike above the node for a chance at re-bloom; for others, cut it at the base.
- Nourish the plant: Continue fertilizing and caring for foliage.
- Be patient: Some orchids bloom just once yearly, so don't discard a healthy plant while it's resting.
Preventing and Managing Orchid Pests and Diseases
Healthy orchids are usually pest-free, but problems can occasionally crop up. Timely action and good habits are your best defense.
Common Orchid Problems
- Mealybugs and scale: Small, white or brown bumps. Wipe with rubbing alcohol and keep leaves clean.
- Aphids: Soft-bodied green or black bugs near blooms. Rinse with water and apply insecticidal soap.
- Root rot: Caused by overwatering. Remove affected roots, repot in fresh mix, and adjust watering.
- Leaf spots or mold: Improve air circulation, avoid water on leaves, and remove infected areas.
Orchid Care Myths Debunked
There are many myths about how to care for orchids. Let's clear up some common misconceptions:
- Myth: Orchids are impossible to grow.
Truth: Most common species are easy when you follow proper care basics. - Myth: Orchids need to be watered with ice cubes.
Truth: This can shock roots. Use lukewarm water instead. - Myth: Orchids won't bloom again.
Truth: With the right care, they rebloom year after year!
Frequently Asked Questions on Orchid Maintenance
How often should I water my orchid?
Watering frequency depends on humidity, pot size, and potting medium. Check moisture with your finger: If the top inch is dry, it's time to water. Usually, every 7-10 days is sufficient.
Where should I place my orchid?
Find a spot with bright, indirect light. A sheer curtain on an east-facing window often provides perfect conditions. Avoid direct sun and cold drafts.
Why are my orchid's leaves turning yellow?
Yellow leaves can result from too much sun, overwatering, or natural aging (old leaves eventually die off). Adjust light and watering to improve conditions.
When do I fertilize my orchid?
Fertilize lightly during the growing season, cutting back in winter or when your orchid is not actively growing.
Advanced Orchid Care Tips for Enthusiasts
Ready to take your orchid growing to the next level? Dive into these expert yet simple tricks:
- Group plants together: This increases humidity naturally (great for windowsills).
- Practice leaf cleaning: Dust can block light. Wipe leaves gently with a damp cloth.
- Observe root health: Healthy roots are firm and green/white. Mushy, brown roots signal problems.
- Rotate orchids: Give all sides of your plant even exposure to light for symmetrical growth.
- Keep notes: Track your routines and blooming cycles in a plant diary to see what works best for your individual orchids.
Conclusion: Grow Confidently with Orchid Care Simplified
Nurturing healthy orchids is a rewarding experience that brings color, joy, and lush blooms to your living space. By understanding their needs and debunking care myths, you'll find orchids are surprisingly resilient and forgiving. Formulaic care -- the right light, proper watering, attentive feeding, and an eye for detail -- is your secret to keeping orchid blossoms flourishing year after year.
Now, with these practical tips and expert insights, you're ready to embark on your orchid care journey. Try different varieties, experiment with potting methods, and enjoy the mesmerizing beauty of these remarkable flowers -- simplified care, unforgettable blooms.
- Remember: Patience, observation, and a gentle touch are the most important tools for every orchid lover. Happy growing!
Latest Posts
Save Time and Money with These Low Maintenance Garden Tricks
Steps to Protect Your Garden from High Wind Damage
Building a Garden Oasis Suitable for Dogs